The Svrf SDK for iOS

The SDK starts by giving you access to the Svrf API, home to the largest search engine for augmented reality and virtual reality content. If you're looking to add face filters to your app, it also allows your users to stream ARKit compatible 3D face filters.
ARKit Face Tracking Requirements
ARKit's face tracking requires an iOS device with front-facing TrueDepth camera. Supported devices include:
- iPhone X, iPhone XS, iPhone XS Max, or iPhone XR.
- iPad Pro (11-inch) or iPad Pro (12.9-inch, 3rd generation).
To integrate face tracking for face filters on other iOS devices, a third-party face tracking library is required.
Examples
ARKitFaceFilterDemo - An example of the SvrfSDK in Swift.
Installation
Install with CocoaPods
1. Install CocoaPods
CocoaPods is a dependency manager for Cocoa projects. Enter the following command to install CocoaPods:
The process may take a moment, please wait. For further installation instructions, please read the CocoaPods installation guide.
2. Add the SvrfSDK entry to your Podfile
If you don't have a Podfile, you can create one by running the command pod init in your project root. Open your project's Podfile and add the SvrfSDK dependency:
Podfile
3. Install the SvrfSDK in the project
To install the SvrfSDK into your Xcode project, run the following command:
Note: If you saw "Unable to satisfy the following requirements" issue during pod install, please run the following commands to update your pod repo and install the pod again:
Install Manually
If you prefer not to use dependency manager, you can integrate the SvrfSDK into your project manually.
Authentication
Simple One-Step Authentication
So you've installed the SvrfSDK, now what? The first step to making your first Svrf API request is to authenticate your application's Svrf API Key. Authentication can be done in just one step with the SvrfSDK. Let's get started!
AppDelegate.swift
Optionally, you can include success and failure closures.
Once you authenticate your Svrf API Key, the SvrfSDK will automatically add your authentication tokens to your request headers and will fetch a new token if it has expired.
Authenticate Using The plist
Alternatively, you can authenticate by adding your Svrf API Key to your plist using the following two steps:
1. Set your API Key
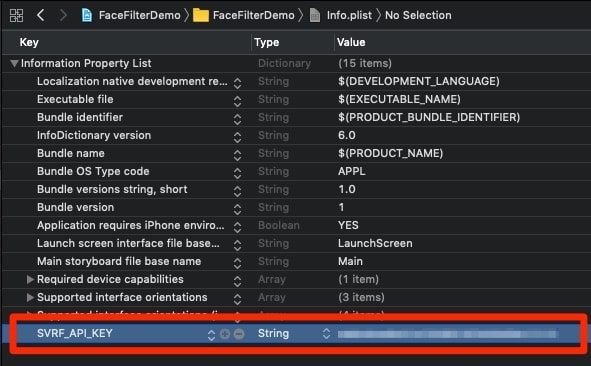
In your plist, create a new definition. In the Key field enter SVRF_API_KEY. Then, set the Type field to String. Finally, add your Svrf API Key in the Value field.
You can edit your plist using Xcode:
Or manually in your plist file:
plist
2. Authenticating
To authenticate your API Key, use the SvrfSDK.authenticate() method. Add it to the application(_:didFinishLaunchingWithOptions:) -> Bool function in the AppDelegate:
AppDelegate.swift
Making API Requests
There are three methods to fetch content from the Svrf API. There's search, that allows your users to enter a query and get back related results. Then there's trending, which provides your users with access to curated immersive content. If you know exactly which piece of content the user needs, you can also get media directly by its id.
Let's take a detailed look into how to do all of these.
Setting Request Options
You can set the request options for search and trending requests using the SvrfOptions struct.
struct
type
In the request options, you can set the type options to an Array of MediaTypes: ._3d, .photo, and .video, or you can set it to nil to get all types of media.
Deprecated
360 photos and 360 videos are no longer supported on Svrf.
stereoscopicType
Deprecated
Stereoscopic 360 photos and 360 videos are no longer supported on Svrf.
category
To retrieve face filters use the category option and set it to .faceFilters.
size
To adjust the quantity of Media returned, adjust the size option. Requests are limited to 100 Media per request.
minimumWidth number?
Deprecated
360 photos and 360 videos are no longer supported on Svrf.
isFaceFilter boolean?
Set to true to retrieve only face filter 3D Media.
hasBlendShapes boolean?
Request 3D Media that has or does not have blend shapes.
requiresBlendShapes boolean?
3D models, specifically face filters, that require blend shapes are best experienced when blend shape animations are active. We strongly suggest that any 3D models where requiresBlendShapes is true must incorporate blend shape animations in their application to ensure the user has a high-quality experience.
If you'd like to use face filters without blend shapes, we strongly urge you to set this option to false.
Using Face Filters Without Blend Shapes
If you'd like to use face filters without blend shapes, we strongly urge you to set `requiresBlendShapes` to `false`.
pageNum
To fetch the next page of search results, use the nextPageNum returned from the previous page in the pageNum option value.
Search
The search() method brings the power of immersive search found on Svrf.com to your app or project. Svrf's search engine enables your users to instantly find the immersive experience they're seeking. Content is sorted by the Svrf rating system, ensuring that the highest quality content and most prevalent search results are
returned.
Search for 3D Face Filters
To search for 3D face filters, set the type to [._3d] and isFaceFilters to true.
In this example, we're querying for sunglass face filters.
Get Trending
The getTrending() provides your app or project with the hottest immersive content. The experiences returned mirror Svrf, from timely cultural content to trending pop-culture references. The trending experiences are updated regularly by human curators to ensure users always get fresh updates of immersive content.
Trending 3D Face Filters
If you want to get trending 3D face filters, change the type value to [._3d] and the isFaceFilter value to true.
Pagination
Fetching the next page of results can be done by setting the pageNum option for search requests or nextPageCursor option for trending requests.
Get Media
To get a specific piece of media from Svrf by ID, use the getMedia() method.
In this example, we're fetching Media with ID 745436.
ARKit and SceneKit Integration
The Svrf iOS SDK makes it simple to plug and play with Apple's ARKit and SceneKit. ARKit is the library used for retrieving real world 3D tracking data, while SceneKit is a library used for rendering 3D scenes.
Get a SCNNode for SceneKit
To add a 3D model from a Svrf API response to a SceneKit scene, you will need to use the generateNode() function. This function fetches the 3D model's file from Svrf's servers and converts it into a usable format for SceneKit, called a SCNNode.
If you're using face filters, you must use the generateFaceFilter()
Now you can request media from the Svrf API and add a 3D model to your scene.
Add a Face Filter to SceneKit
To generate a face filter that can be used in SceneKit, you need to use the generateFaceFilter() function. Using this function makes it easy to add a face filter to your scene.
This function, like generateNode(), fetches a 3D file from Svrf and converts it to a format that is renderable in SceneKit. It also manages the intricacies of face filters, such as setting up occlusion materials. Don't know what an occlusion material is? Don't worry about it, because it is taken care of it.
If you'd like to use a custom occluder, you can remove the occluder provided by the 3D model by setting useOccluder to false.
On success, generateFaceFilter() returns a class SvrfFaceFilter. This class provides you with a property node that contains the SCNNode with the 3D face filter. It also contains a property sceneOverlay that can be used to render the overlays that are included in face filters.
You can now fetch a face filter from the Svrf API and add it to your scene so users can try it!
Mapping Blend Shapes
ARKit 2 and newer provides the ability to track a user's facial expressions, called blend shapes. These blend shapes can be mapped to a 3D model, giving users a more immersive experience.

To map make it easy to map blend shapes to a 3D face filter, SvrfFaceFilter includes a function setBlendShapes().
Blend Shapes, AKA...
Blend shape animations are also known as: morph target animations, per-vertex animations, shape interpolation, or shape keys.
In the VirtualFaceContent, pass the ARFaceAnchor.blendShapes from ARKit's face tracking to the SvrfFaceFilter.setBlendShapes() function in the update() function. This will update the blend shapes with each new paint of the scene. That's it, the SDK will take care of the rest and render the blend shapes properly.